


How To Add Glitter To Your Grout

Putting a personal touch on your tiles doesn’t stop at your choice of tiles; using glitter grout is a perfect way to add a unique sparkle to your room! With our glitter grout application guide and expert tips below, along with our ‘how-to’ YouTube video, you can find out exactly how to achieve the glitter trend.
Products required:
- Mapei Kerapoxy Design
- Mapei Glitter
- Mapei Kerapoxy Cleaner Spray
Tools & accessories required:
- Floor protection sheet
- Protective gloves
- Spatula
- Mechanical stirrer
- Hard rubber float
- 2x Buckets of water
- 2x Sponges
- Microfibre cloth
Preparing and applying your glitter grout
Prepare the area
Before starting the process of adding new grout to tiles, any existing grout or loose materials must be removed from the tile joints. This provides a blank canvas for adding new grout and ensures maximum effect of the new glitter grout.
Using a floor protection sheet, be sure that all flooring around the area you wish to grout is covered and protected from spillages.
Prepare the glitter grout
Whilst preparing the grout, you must be wearing protective gloves. Upon opening the Mapei Kerapoxy Design Tub, you will see two components within the tub; a filler and a reaction hardener.
Remove the smaller tub of reaction hardener and add into the bigger tub of filler with a spatula.
On a slow setting, use the mechanical stirrer to mix together the two components of the grout. This should be stirred for 3-4 minutes to combine well into a smooth paste.

Once the grout is well mixed, it’s time to add the Mapei glitter! You can add 1-3 sachets of the glitter, but we recommend 2 sachets for the best glitter results! Empty the sachets into the tub of grout and work well into the mix, folding in the glitter with a spatula.
Using the mechanical stirrer on the same slow setting, mix the glitter slowly into the grout mixture to ensure the glitter is dispersed evenly throughout the product.
Apply glitter grout to tiles
Once you are happy with the mix, the grout will remain workable for approximately 45 minutes, so the next step is to start applying the glitter grout to the tiles. To do this, you will need to use the hard rubber float to pick up the grout mixture and apply to the tile joints. The application method is purely down to personal preference, although we advise angling the rubber float so that any air will be removed from the joints as product is applied.

Apply the product all over tiles, ensuring all joints are covered. Don’t worry about covering the tiles with grout, as this will be removed in the next steps.
Remove excess glitter grout from tile surface
After filling all of the joints with grout, remove any excess grout from the tile surfaces by sweeping over the rubber float diagonally across tiles, at a 45 degree angle. At this point, you must take care to only remove grout from the surface and not any grout that you have spent time adding to the tile joints.
Wipe down the tiles
You will begin to see the grout material begin to dry on the tile surface; this means that the tiles are ready to be washed down to reveal the dry glitter grout.
Fill your two buckets with clean water and put a sponge in each bucket.

Using your first sponge, soak up some water from the first bucket and start to wipe away the grout mixture from the tile surface in circular motions. Be sure to rinse the sponge in the first bucket regularly so that the grout isn’t being spread across the surface; the aim here is to remove the bulk of the excess product from the tiles.
Using the second sponge, wipe the tiles down again using clean water from the second bucket. Using a diagonal motion and turning the sponge regularly ensure that the majority of the remaining product residue is removed.
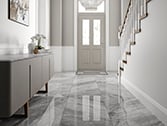
Step back and admire your glitter grout work!
Tile Giant tips for the best glitter grout results:
For best results, the whole tub of Mapei Kerapoxy Design Grout should be mixed at the time of usage. Part mixing is possible, however you would need to weigh out the materials and the required dosage using calibrated digital scales, to make sure the proportions of product used are correct.
When applying grout to tiles, try to compact the glitter grout into the joints as much as possible, so that a full joint of product is achieved.
If after washing with water you can still see a slight film left on the surface of the tile, we recommend using Mapei Kerapoxy cleaner to remove any remaining grout residue the day after grouting.
Using the Kerapoxy cleaning spray is really easy to use, simply apply to the wall with the spray action bottle and leave on the tile surface for a sufficient amount of time, to soften the surface material.
Then, use a clean microfibre cloth in a circular motion, to buff the tile surface to a clean and sparkling finish.
Once your Mapei glitter grout is fully cured, it provides excellent stain resistance and becomes an easily cleanable surface, whilst also adding a personal touch to your tiles.

Share your photos with us on Twitter or Instagram to be featured, using #TileGiant
Head over to our YouTube channel to browse more how-to videos